Preventing and treating finger and upper limb injuries in climbing
Article updated on .
This article covers a few fairly common climbing injuries: A2 pulley, medial epicondylitis, lateral epicondylitis, synovitis. How to identify them, the warning signs that come before the injury, the return to training, clean taping, and 5 prevention rules that hold up over the long term.
This article is no substitute for a consultation: if in doubt, a physio trained in climbing or a sports doctor is the right place to start.
Anatomy: what holds (and what breaks)
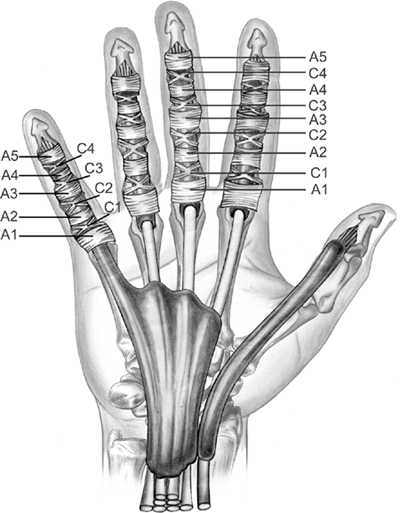
Finger strength comes from the flexor muscles in the forearm. Two families: the flexor digitorum superficialis (which flexes the proximal interphalangeal joint) and the flexor digitorum profundus (which flexes the distal interphalangeal joint). Their tendons run down through the palm, cross the wrist, then follow each finger to their insertion on the phalanges.
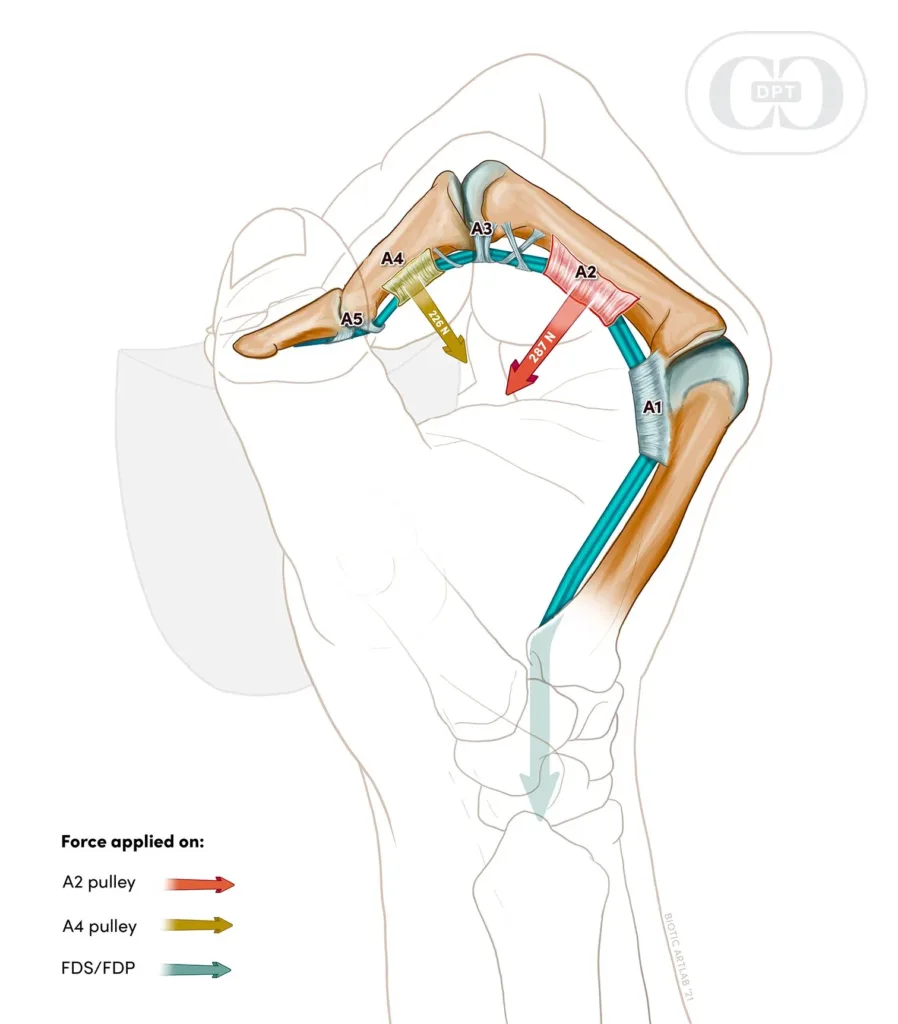
To keep these tendons pressed against the bone during flexion (otherwise they would bowstring), a series of fibrous pulleys holds them in place. They are named A1 to A5 (annular) and C1 to C3 (cruciform). The two critical pulleys for the climber are A2 (on the proximal phalanx) and A4 (on the middle phalanx). They are the ones that take most of the load in a crimp.
An A2 pulley rupture on the middle or the ring finger is the most common one in climbing: these are the two fingers that take the peak force in a full crimp, and the crimp geometry multiplies the tension on the pulley by a factor of 3 to 4 compared with the force applied to the hold. One sudden load in a crimp, and A2 is the first thing to go.
A quick definition of the full crimp: the proximal interphalangeal joint flexed as far as it goes and the distal interphalangeal joint in hyperextension (fingertip pressed flat against the hold), with the thumb locking over the index finger. Not to be confused with the half crimp, much gentler, where the distal joint stays neutral.
To understand how these structures get stronger (or weaker), the article finger strength in climbing covers specific hangboard work.
The 4 most common injuries
A2 pulley rupture
This is the climber’s signature injury. Typical mechanism: full crimp on a small hold, a foot that slips or a crux where the load suddenly goes from 2 fingers to one, and the pulley lets go. The pop is often audible, sometimes heard by the partner standing next to you. Swelling at the base of the finger and an immediate loss of power follow. Resisted flexion becomes painful.
The usual classification has 4 grades:
- Grade 1: strain, microtearing. Pain without a pop, no bowstringing.
- Grade 2: partial rupture of one pulley (often A2). A faint pop is possible, moderate swelling.
- Grade 3: complete rupture of one pulley. Clear pop, visible bowstringing when you flex the finger against resistance (the tendon lifts off the bone).
- Grade 4: multiple ruptures (A2 + A3 + A4 for example). Obvious bowstringing, surgical management is frequent.
Audible pop or visible bowstringing: get it seen without delay, ideally by a sports doctor, who will order an ultrasound or an MRI. Grades 1 and 2 heal in 6 to 12 weeks with a conservative protocol. Grades 3 and 4 often call for a surgical opinion.
Medial epicondylitis (golfer’s elbow)
Pain on the inside of the elbow, at the insertion of the flexor and pronator muscles. It comes from repeated pulling and chronic loading of the finger flexors. Gradual onset over several weeks. The pain wakes up when you palpate the medial epicondyle, and resisted wrist flexion becomes uncomfortable.
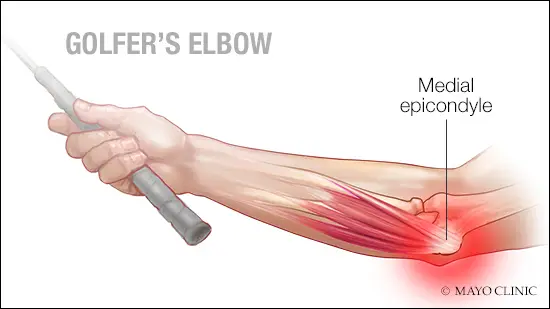
Known aggravating factors: the volume of overhanging climbing and overuse of the campus board. A poor flexor/extensor balance makes it all worse.
Lateral epicondylitis (tennis elbow)
Pain on the outside of the elbow, at the insertion of the wrist and finger extensors. It comes from the extensors stabilising the wrist while the flexors pull, especially during sustained crimping. The pain is reproduced by forced wrist extension against resistance, or simply by lifting a full bottle with the arm straight.

Synovitis and capsulitis of the proximal interphalangeal joint
Inflammation of the joint capsule of the middle joint of the finger. Symptoms: morning stiffness lasting 10 to 15 minutes, diffuse swelling of the joint, pain on passive mobilisation, sometimes a palpable thickening of the capsule. Often brought on by too much crimping volume on small holds, or by coming back too abruptly after a break. It readily turns chronic if you ignore the signal.
Recognising the warning signs
The signs to watch:
- Pain that persists beyond 24 hours after the session.
- Morning stiffness that lasts more than 10 minutes after waking.
- Unilateral loss of strength (one finger clearly weaker than the same finger on the other hand).
- Local swelling, however slight, at the base of a finger.
- An audible pop or snap during effort, even without immediate pain.
- A cord-like sensation under the skin when you flex the finger against resistance.
The earlier you get it seen, the shorter the rehab.
How to tape a finger after an injury
Its role: to limit the gap between the tendon and the bone during the healing phase, and to partly offload the injured pulley during the gradual return to training. The literature is still divided on its value as routine prevention on a healthy finger, so it is ordinarily kept for therapeutic use.
When to tape
- During the gradual return after an A2 pulley injury (from phase 2 onwards, see below).
- On a physio’s advice, if there is residual discomfort several months after an injury.
- Routine preventive use is more controversial, except in specific cases (coming back after a very long break, specific terrain).
Gear
Rigid sports tape in strips 1.25 cm wide, firm enough to support but not too thick. Elastic tapes of the kinesio tape type do not do the same job (they give no mechanical support to the pulley).
H-tape method
H taping is the most effective way to offload A2. It forms an H between the two phalanges that flank the injured pulley:

- Cut a strip of tape about 7 to 8 cm long, and slit it lengthways at both ends (over 1.5 cm on each side), so as to form a wide central band flanked by 4 tabs.
- Stick the central part of the H over the proximal interphalangeal joint (the middle crease of the finger).
- Wrap the 4 tabs in a spiral around the proximal and middle phalanges, without covering the middle joint.
- Check how it feels: the finger moves, circulation is intact (fingertip not turning blue, no pins and needles).
Simple circular method
Quicker, less effective but useful as a stopgap: one wrap of tape around the proximal phalanx, at the level of the A2 pulley (so just below the proximal interphalangeal joint), tight without strangling. 2 wraps maximum, otherwise you block mobility.
Mistakes to avoid
- Taping too tight: the finger goes white or purple, pins and needles, you have cut off the circulation.
- Covering the joint: you block mobility, the benefit is cancelled out.
- Keeping the tape on all day: it goes on for the session, it comes off afterwards. Skin left to sweat under tape breaks down fast.
- Counting on it to climb beyond what is reasonable: tape supports, it does not repair.
The gradual return after a pulley injury
The protocol below is given as a guide, for information only, and does not replace a medical consultation, which should be your first reflex! The protocol that follows concerns a grade 1 or 2 A2 pulley injury (without bowstringing). For grades 3 and 4, the plan is set by the surgeon or the sports doctor based on the imaging findings. In every case, these phases are indicative: real progress follows how it feels, not the calendar.
Phase 1, weeks 1 to 2: relative rest
Stop climbing. Ice for 10 to 15 minutes 2 to 3 times a day if there is swelling. Anti-inflammatories only if prescribed, not as routine self-medication (the initial inflammation is part of healing). Gentle, pain-free mobilisation of the finger to avoid adhesions. The rest of the body does not stop for all that: cardio, legs, core, antagonist exercises.
Phase 2, weeks 3 to 6: light restart
Introduction of very light no-hangs (5 to 10 kg of tension, never more). A no-hang means applying controlled pull on a hold with a strap connected to a weight or to a dynamometer, feet on the ground. The load is known to the kilo, and an injury forgives no deviation. Climbing is possible on very big holds without pushing, in open hand.
Phase 3, weeks 6 to 12: building the load back up
Assisted hangs on a jug, with a resistance band taking weight off if needed. Half crimp OK on a wide hold, full crimp still off limits. Climbing volume goes back up in steps of 20% per week, never abruptly. Any return of pain sends you back a phase.
Phase 4, beyond 12 weeks: back to max strength
Gradual reintroduction of the full crimp on medium holds (20 mm), then on edges. Max hangs and the campus board come back last, never before 4 months for grade 2 injuries. Getting back to 100% of pre-injury strength takes 6 months on average for a partial rupture, up to 12 months for a complete rupture that has been operated on.
No-hangs are the number one tool of this rehab, and The Climbing Bible makes a point of it: they let you load the finger to the kilo, so you can stay exactly inside the healing window. A portable hangboard hung at hip height, a strap and a weight are enough: progress becomes measurable. Woodrock’s Le Bloc lends itself particularly well to this work on the ground.
To structure this work beyond rehab, the article climbing hangboard programme covers sets of no-hangs, max hangs and repeaters.

5 prevention rules that work
- Warm up for 20 to 30 minutes before any intense effort. Joint mobilisation of the fingers and the wrist, hangs/pull-ups on good holds, progressive hangs, … The details in climbing warm-ups.
- Vary your grip positions. The half crimp and the open hand load the A2 pulley less than the full crimp. Keep the full crimp for the moves where it is genuinely needed, not as your default grip.
- Balance flexors and extensors. Work the antagonist muscles specifically and build exercises into your warm-up routine.
- Deload regularly. Every 3 to 8 weeks of training, take 7 to 10 days at reduced load (easy climbing, no hangboard, no campus).
- Listen to the signals. Morning stiffness settling in, a diffuse discomfort that lasts 2 sessions, a finger that seems weaker than the same one on the other hand: the next session happens on big holds, and you watch. An injury caught at that stage clears up in 10 days, ignored it costs you 6 months.

Frequently asked questions
How long does an A2 pulley take to heal?
For a grade 1 or 2 (partial rupture), count on 6 to 12 weeks before reintroducing the full crimp, and 4 to 6 months to get your pre-injury strength back. For a grade 3 or 4 treated surgically, count on 6 to 12 months depending on the management. The exact timeline depends on the grade, on age, on the quality of the rehab protocol, and on the climber’s patience.
Does taping prevent injuries?
The literature is still divided. No solid study shows that preventive taping on a healthy finger reduces the risk of rupture in a trained climber. Its usefulness is clear, on the other hand, during the return-to-training phase after a pulley injury, where it mechanically offloads the tendon. Use it in rehab, not as routine prevention.
Can you train while it heals?
Yes, and it is even recommended, but in measured doses. The light no-hangs introduced from phase 2 onwards stimulate collagen healing. The rest of the body keeps ticking over in the meantime (cardio, legs, core, antagonist exercises). The classic mistake is prolonged complete rest, which detrains you without speeding up recovery.
How do you know if it is a real rupture or just pain?
2 signs point to a clear rupture: an audible pop at the moment of the incident, and visible bowstringing when you flex the finger against resistance (the tendon lifts off the bone, you can see the “cord” under the skin). Either way, a medical consultation is necessary if the pain persists and you are in doubt.
A propos de l’auteur
Woodrock c’est le mariage de 2 passions : la menuiserie et l’escalade. Concevoir, fabriquer, usiner et vous envoyer des poutres d’escalade de qualité est une partie de mon quotidien. Le reste du temps, j’aime grimper sur les falaises des contreforts du Vercors.